An older HP printer may sometimes produce blurred text, misaligned colors, double images, or uneven lines even when the ink cartridges are working correctly. Printhead alignment is designed to correct these problems by adjusting how the printer positions ink on the page.
If the original HP alignment software is unavailable, a technician may be able to perform alignment using the printer's control panel, printed alignment sheet, service procedure, or manual adjustment mechanism, depending on the exact model.
Not every HP printer supports the same manual procedure, so the correct method should always be based on the printer model and its service documentation.
Problem
The customer has an older HP inkjet printer that produces poor alignment, but the original computer software or printer utility is unavailable, unsupported, or no longer working.
The printer may still print, but text and colors do not line up correctly.
What Problem Is the Customer Facing?
Customers may experience:
- Text appears blurry or doubled
- Vertical lines are not straight
- Colors appear slightly shifted
- Black and color text do not line up
- Images have visible color shadows
- Horizontal lines appear uneven
- Printed graphics look distorted
- Printer produces poor-quality copies
- Printhead alignment software is unavailable
- Old printer drivers no longer work correctly
- Alignment fails through the computer
- Printer works but output quality remains poor
- New cartridges did not solve the alignment problem
Root Causes of the Problem
1. Printhead Alignment Is Incorrect
The printhead may be slightly misaligned after cartridge replacement, long periods of inactivity, or servicing.
2. Cartridge or Printhead Was Replaced
Replacing an ink cartridge or printhead can sometimes require an alignment procedure.
3. Dried Ink or Blocked Nozzles
Clogged nozzles can create missing lines and uneven patterns that may look like an alignment problem.
4. Dirty Cartridge Contacts
Ink residue, dust, or oxidation on electrical contacts can interfere with proper cartridge communication.
5. Old or Unsupported Printer Software
Older HP printers may rely on software that no longer works correctly with newer operating systems.
6. Printer Firmware or Memory Issue
An older printer may fail to retain alignment information correctly because of firmware or internal memory problems.
7. Paper or Print Quality Setting
Incorrect paper type, poor-quality paper, or inappropriate print settings can make alignment defects more noticeable.
8. Mechanical Printhead Problem
A damaged carriage, encoder strip, belt, or printhead mechanism can cause repeated alignment problems that cannot be solved through calibration alone.
How Can Customers Identify the Issue?
Look for:
- Text has a shadow or duplicate edge
- Color blocks do not line up
- Vertical lines appear jagged
- Printed patterns are offset
- Alignment was previously correct but suddenly changed
- Problem appeared after changing cartridges
- Printer produces an alignment page but output remains incorrect
- Software-based alignment is unavailable
- Printer is an older HP model
- Cleaning the printhead does not completely solve the problem
- Alignment improves temporarily and then becomes incorrect again
Possible Solutions
1. Identify the Exact HP Printer Model
Before attempting manual alignment, identify the exact printer model.
Check the printer's:
- Model number
- Product number
- Control panel
- User manual
- Service documentation
Different HP models use different alignment procedures.
2. Check the Printhead and Cartridges
Make sure the cartridges or printhead are installed correctly.
Check for:
- Incorrect cartridge placement
- Damaged cartridges
- Loose installation
- Ink leakage
- Dirty electrical contacts
- Expired or unsuitable consumables
3. Clean the Printhead or Nozzles First
Alignment cannot compensate for heavily blocked nozzles.
If the printer supports a built-in cleaning function, perform the manufacturer's recommended cleaning procedure before alignment.
Avoid excessive cleaning cycles because they can consume significant amounts of ink.
4. Use the Printer's Control Panel
Some older HP printers allow alignment directly from the printer's buttons or display.
Depending on the model, look for options such as:
- Tools
- Setup
- Printer Maintenance
- Align Printhead
- Align Cartridges
- Print Alignment Page
- Calibrate Printer
If an alignment option is available, follow the printer's on-screen instructions.
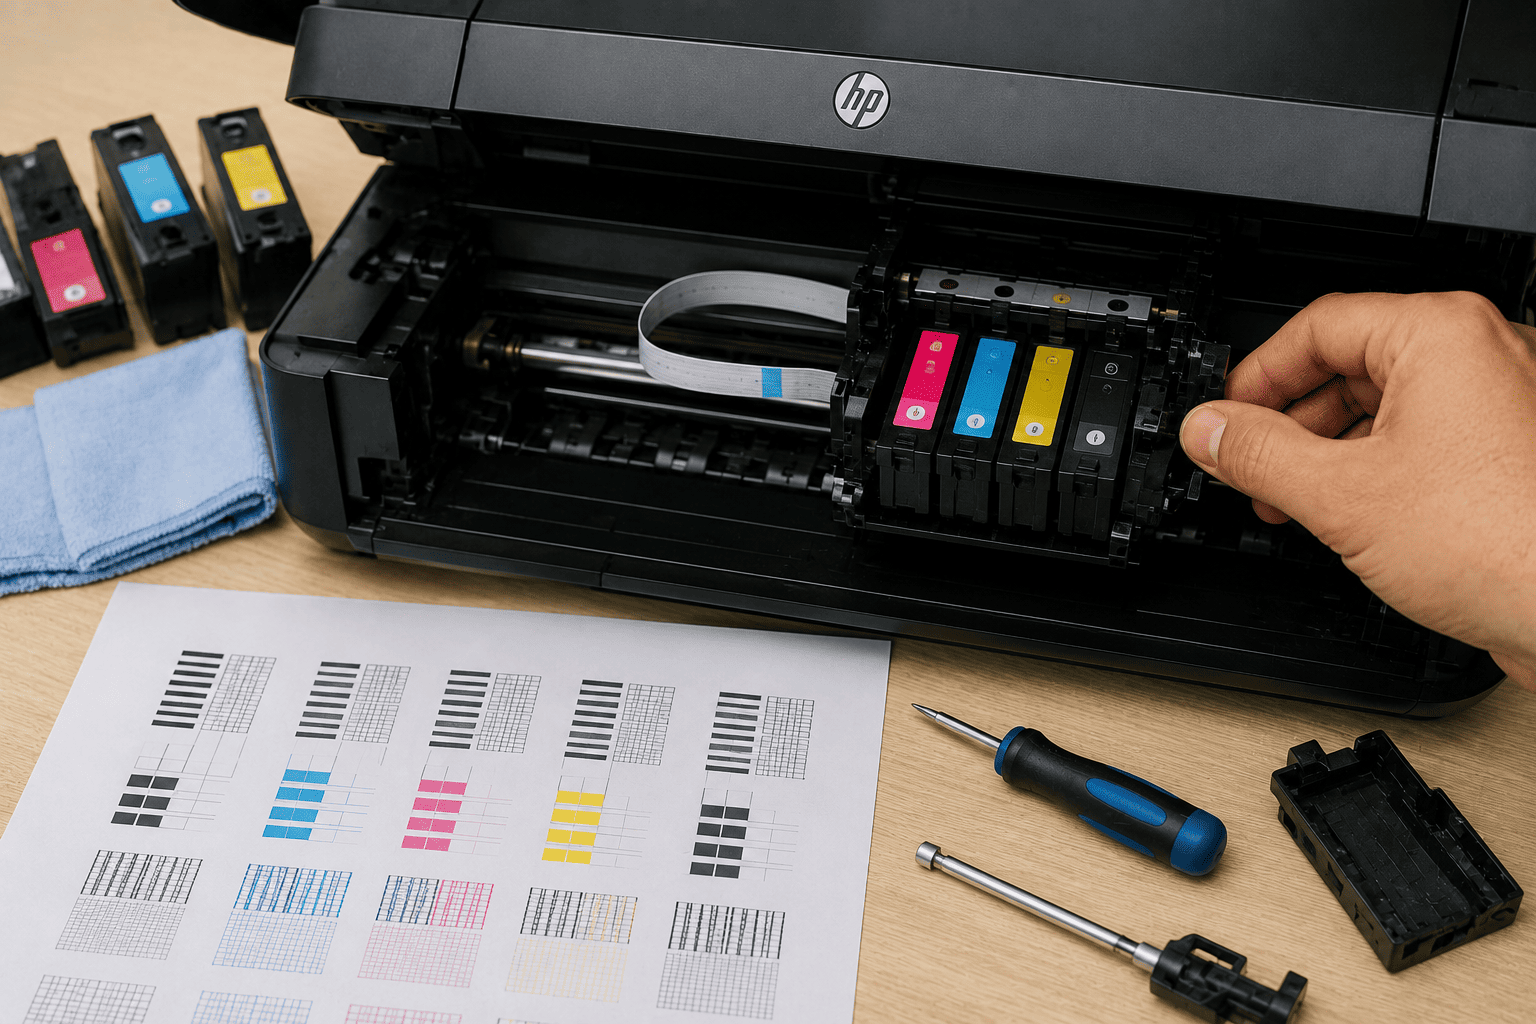
5. Print an Alignment Page
The printer may produce a page containing:
- Lines
- Color blocks
- Numbered patterns
- Lettered sections
- Alignment grids
The printer uses this page to determine the correct printhead position.
6. Inspect the Alignment Pattern
Examine the printed alignment sheet under good lighting.
Look for:
- Straight lines
- Gaps
- Color shifts
- Broken patterns
- Double edges
- Misaligned black and color sections
If the printer asks the user to select the best pattern, choose the pattern that appears most accurately aligned.
7. Manually Enter Alignment Values When Supported
Some older HP printer models may provide manual calibration or service-level adjustment options.
If the printer supports manual values, record the original settings before making changes.
Make small adjustments rather than changing multiple values at once.
8. Use the Printer's Built-In Service or Maintenance Mode Carefully
Some older printers include diagnostic or maintenance functions accessible through specific button combinations.
However, service-mode procedures vary significantly between models.
Only use a documented procedure for the exact printer model.
Incorrect service settings can cause additional problems.
9. Check the Encoder Strip
The encoder strip helps the printer determine the carriage's position.
Dust or ink contamination on the strip can cause:
- Misaligned printing
- Carriage-position errors
- Repeated alignment failures
- Incorrect printhead positioning
A technician can inspect and carefully clean the encoder strip using the manufacturer's recommended procedure.
10. Inspect the Carriage and Belt
If alignment remains incorrect, inspect the mechanical system.
Check:
- Carriage movement
- Carriage belt
- Guide rail
- Printhead holder
- Encoder system
- Mechanical obstructions
A loose belt or damaged carriage mechanism can prevent accurate alignment.
11. Check Paper Type and Print Settings
Use appropriate paper and verify the printer's media settings.
Test with good-quality paper recommended for the printer.
Incorrect paper settings can produce output that appears poorly aligned even when the printhead is correctly positioned.
12. Print Multiple Test Pages
After alignment, print several test pages.
Check:
- Text sharpness
- Color registration
- Vertical lines
- Horizontal lines
- Image edges
- Repeated patterns
A single successful page does not always confirm that the printer is fully stable.
13. Check Whether Alignment Is Retained
Turn the printer off and back on, then print another test page.
If alignment is lost after restarting, the problem may involve:
- Printer memory
- Firmware
- Internal electronics
- Printhead/cartridge communication
- Hardware failure
14. Consider Printhead Replacement
If the printhead is worn or damaged and alignment cannot correct the problem, replacement may be necessary.
Before replacing it, verify that the carriage and encoder system are functioning correctly.
15. Avoid Random Service-Mode Adjustments
Do not change calibration values simply because they appear related to alignment.
Service settings can affect other printer functions.
Always record the original values and follow model-specific service documentation.
Why Choose Guru Computer Solution?
1. Experienced HP Printer Technicians
Our technicians can diagnose printhead alignment, cartridge, encoder, carriage, and print-quality problems on older HP printers.
2. Manual Alignment Support
When software-based alignment is unavailable, we can check whether the printer supports control-panel or model-specific manual alignment procedures.
3. Printhead and Cartridge Diagnosis
We can determine whether the problem is caused by alignment, blocked nozzles, cartridge problems, or a damaged printhead.
4. Mechanical Inspection
If alignment keeps failing, we can inspect the encoder strip, carriage belt, guide mechanism, and related components.
5. Careful Older Printer Servicing
Older printers can contain delicate mechanical and electrical components. Our technicians use careful inspection and model-appropriate procedures.
6. Affordable Repair
We diagnose the actual cause of the alignment problem before recommending printhead replacement or a new printer.