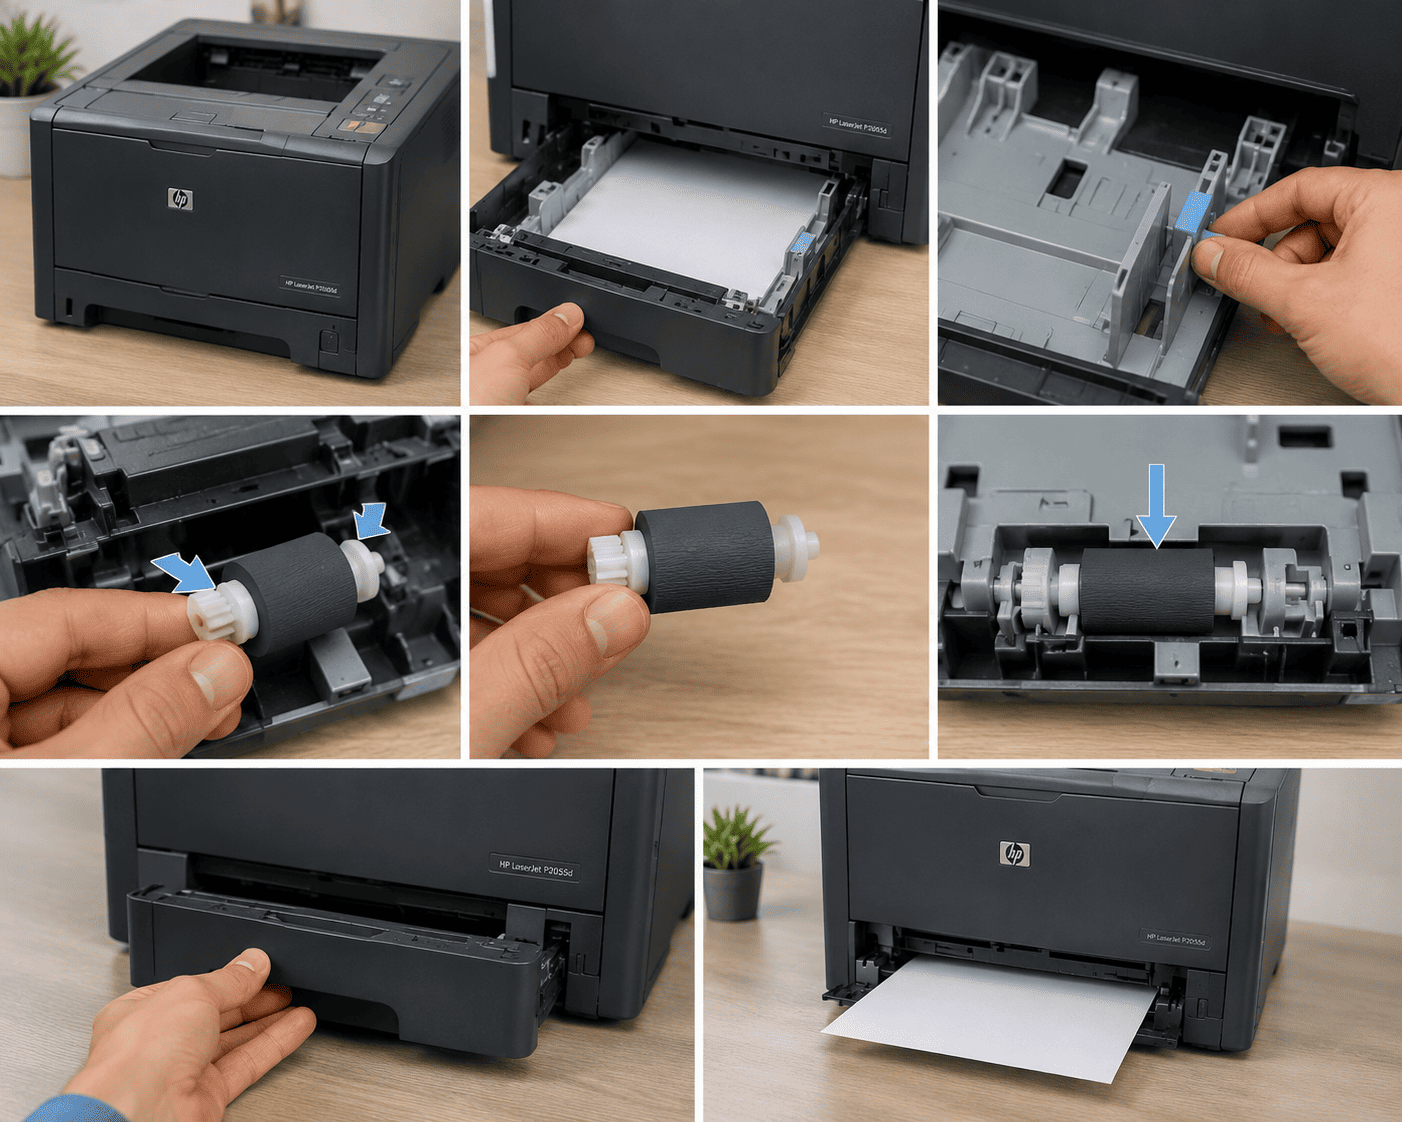
A worn or dirty pickup roller can cause an HP LaserJet printer to misfeed paper, pick up multiple sheets, or fail to pick up paper from the tray. The pickup roller is responsible for grabbing paper from the tray and feeding it into the printer's paper path.
On older HP LaserJet models such as the P2055 and P3015 series, replacing the pickup roller can often restore reliable paper feeding when cleaning the roller no longer solves the problem.
Problem
The customer has an HP LaserJet printer that has difficulty picking up paper from the tray.
The printer may report a paper-out condition even when the tray is full, repeatedly attempt to feed a page, or pick up multiple sheets at once.
What Problem Is the Customer Facing?
Customers may experience:
- Printer does not pick up paper
- HP LaserJet says “Load Paper” when the tray is full
- Paper feeds only occasionally
- Printer picks up multiple sheets
- Paper enters the tray crooked
- Printer produces paper-feed errors
- Paper stops immediately after entering the printer
- Printer works better with a small stack of paper
- Manual feeding works but tray feeding does not
- Printer makes repeated feeding attempts
- Paper pickup becomes worse with heavier paper
- Printer needs paper to be pushed forward manually
- Paper-feed problem occurs repeatedly from the same tray
Root Causes of the Problem
1. Pickup Roller Is Worn
The rubber surface of the pickup roller becomes smooth over time.
A worn roller loses its ability to grip the paper correctly.
2. Pickup Roller Is Dirty
Paper dust, toner residue, and environmental debris can accumulate on the roller surface.
This reduces friction between the roller and paper.
3. Separation Pad Is Worn
The separation pad helps prevent multiple sheets from feeding together.
If it becomes worn, the printer may grab two or more sheets at once.
4. Poor-Quality or Damp Paper
Paper that has absorbed moisture can stick together and create feeding problems.
Incorrect paper storage can therefore appear to be a printer hardware fault.
5. Paper Tray Is Overloaded
Loading more paper than the tray's recommended capacity can affect the pickup mechanism.
6. Paper Guides Are Incorrectly Positioned
If the tray guides are too loose or too tight, paper may not be aligned correctly with the pickup mechanism.
7. Pickup Mechanism Is Dirty or Damaged
Dust or mechanical wear around the pickup assembly can prevent reliable feeding.
8. Tray or Lift Mechanism Problem
If the paper stack is not being raised correctly toward the pickup roller, the roller may not make sufficient contact with the top sheet.
9. Damaged Gear or Drive Mechanism
A worn gear or mechanical component can prevent the pickup roller from turning correctly.
10. Paper Path Obstruction
Small pieces of torn paper or foreign objects can interfere with the feeding mechanism.
How Can Customers Identify the Issue?
Look for:
- Tray is full but printer says “Load Paper”
- Printer makes a feeding sound but no paper enters
- Paper feeds only after several attempts
- Multiple pages feed together
- Paper enters at an angle
- Pickup roller looks shiny or smooth
- Roller surface contains dust or residue
- Problem occurs primarily with Tray 2
- Manual feed works normally
- Printer feeds better after cleaning
- Problem gets worse over time
- Printer frequently requires paper to be pushed forward
Possible Solutions
1. Check the Paper First
Before replacing any parts, verify that the paper itself is suitable.
Check:
- Correct paper size
- Correct paper type
- Dry paper
- Flat sheets
- No curled edges
- No stuck sheets
- Properly stored paper
Try a fresh, dry stack of paper to rule out a media problem.
2. Check the Paper Tray
Remove the tray and inspect it for:
- Broken guides
- Cracks
- Foreign objects
- Damaged lift mechanism
- Incorrect paper loading
Make sure the paper stack is below the tray's maximum fill line.
3. Check the Paper Guides
Adjust the tray guides so they touch the paper stack without squeezing it.
The paper should remain aligned while still being able to move freely.
4. Clean the Pickup Roller
If the roller is dirty but not worn, careful cleaning may temporarily restore traction.
Turn off and unplug the printer according to the manufacturer's safety instructions before accessing the roller.
Use an appropriate lint-free material and manufacturer-approved cleaning method.
5. Inspect the Pickup Roller
Look for:
- Smooth rubber surface
- Cracks
- Hardened rubber
- Uneven wear
- Toner or paper dust
- Missing rubber sections
A visibly worn roller should be replaced rather than repeatedly cleaned.
6. Replace the Pickup Roller
For the appropriate HP LaserJet model, a technician can remove the worn roller and install the correct replacement.
The exact removal process varies by model and tray configuration.
After installation, make sure the roller is properly seated and rotates correctly.
7. Inspect the Separation Pad
If the printer picks up multiple pages, inspect the separation pad or related separation mechanism.
A worn separation component may need replacement along with the pickup roller.
8. Check the Roller Drive
If a new roller does not rotate correctly, inspect the drive mechanism.
Check for:
- Damaged gears
- Broken drive components
- Loose assemblies
- Mechanical obstructions
- Incorrect roller installation
9. Inspect the Tray Lift Mechanism
The paper stack must be raised correctly so that the pickup roller can contact the top sheet.
A damaged tray lift mechanism can cause paper pickup failures even with a new roller.
10. Check the Paper Path
Inspect the paper path for:
- Torn paper
- Paper dust
- Foreign objects
- Damaged guides
- Obstructions
Remove debris carefully without damaging sensors or mechanical components.
11. Test With a Small Stack of Paper
After servicing, load a small amount of fresh paper and test the printer.
Then gradually increase the paper quantity.
This helps determine whether the feeding problem is resolved across different stack heights.
12. Test Multiple Paper Sizes
If the printer supports multiple paper sizes, test the appropriate sizes supported by the tray.
This can help identify tray-guide or media-specific problems.
13. Check for Paper-Feed Error Codes
If the printer continues reporting a paper-feed error, record the exact error message or code.
The code can help determine whether the problem is related to:
- Pickup
- Separation
- Paper path
- Sensor
- Tray mechanism
14. Inspect the Paper Sensor
If the printer picks up paper but incorrectly reports that the tray is empty, a paper sensor or actuator may require inspection.
A sensor problem is different from a worn pickup roller and may require additional diagnosis.
15. Perform a Final Feed Test
After replacing the pickup roller:
- Load fresh paper
- Confirm tray guides are positioned correctly
- Print multiple pages
- Test single-sheet feeding
- Test continuous printing
- Check for double feeds
- Check for skewed pages
- Confirm there are no paper-feed errors
A successful repair should provide consistent paper pickup without manual assistance.
Why Choose Guru Computer Solution?
1. Experienced HP LaserJet Technicians
Our technicians can diagnose pickup rollers, separation pads, trays, sensors, and paper-feed mechanisms on HP LaserJet printers.
2. Pickup Roller Replacement
We can inspect worn rollers and replace them with suitable parts for the exact printer model.
3. Paper Feed Diagnosis
We don't automatically replace the roller. We check whether the problem is actually caused by the roller, separation mechanism, tray, sensor, or paper.
4. Careful Printer Servicing
Older LaserJet printers contain mechanical components that require careful handling during disassembly and servicing.
5. Complete Paper-Feed Testing
After repair, we test the printer with multiple pages to confirm consistent feeding.
6. Affordable Repair
We diagnose the actual paper-feed problem before recommending unnecessary replacement of the printer or major components.