A laser printer is a surprisingly delicate machine dressed up as a workhorse. High-voltage electronics, precision optics, and finely milled mechanical parts are all working alongside a fine, abrasive powder that gets into everything. Toner dust accumulates, paper sheds fibers, rubber rollers gradually harden, and sensors slowly get coated. None of this causes dramatic failure overnight. It causes the accelerated wear that eventually does, which is exactly why a small, consistent maintenance routine matters more than an occasional deep clean after something already looks wrong.
Why a Written Checklist Beats "We'll Get to It"
Most small offices don't have a dedicated IT person whose job includes printer upkeep, which means maintenance either happens reactively, after a jam or a streak-covered page, or it doesn't happen at all until the printer forces the issue. A simple, assigned checklist with clear intervals is enough for most small offices to get real results without needing a formal maintenance program. The goal isn't complexity. It's consistency.
Daily and Weekly Checks (2 Minutes, Whoever's Nearest the Printer)
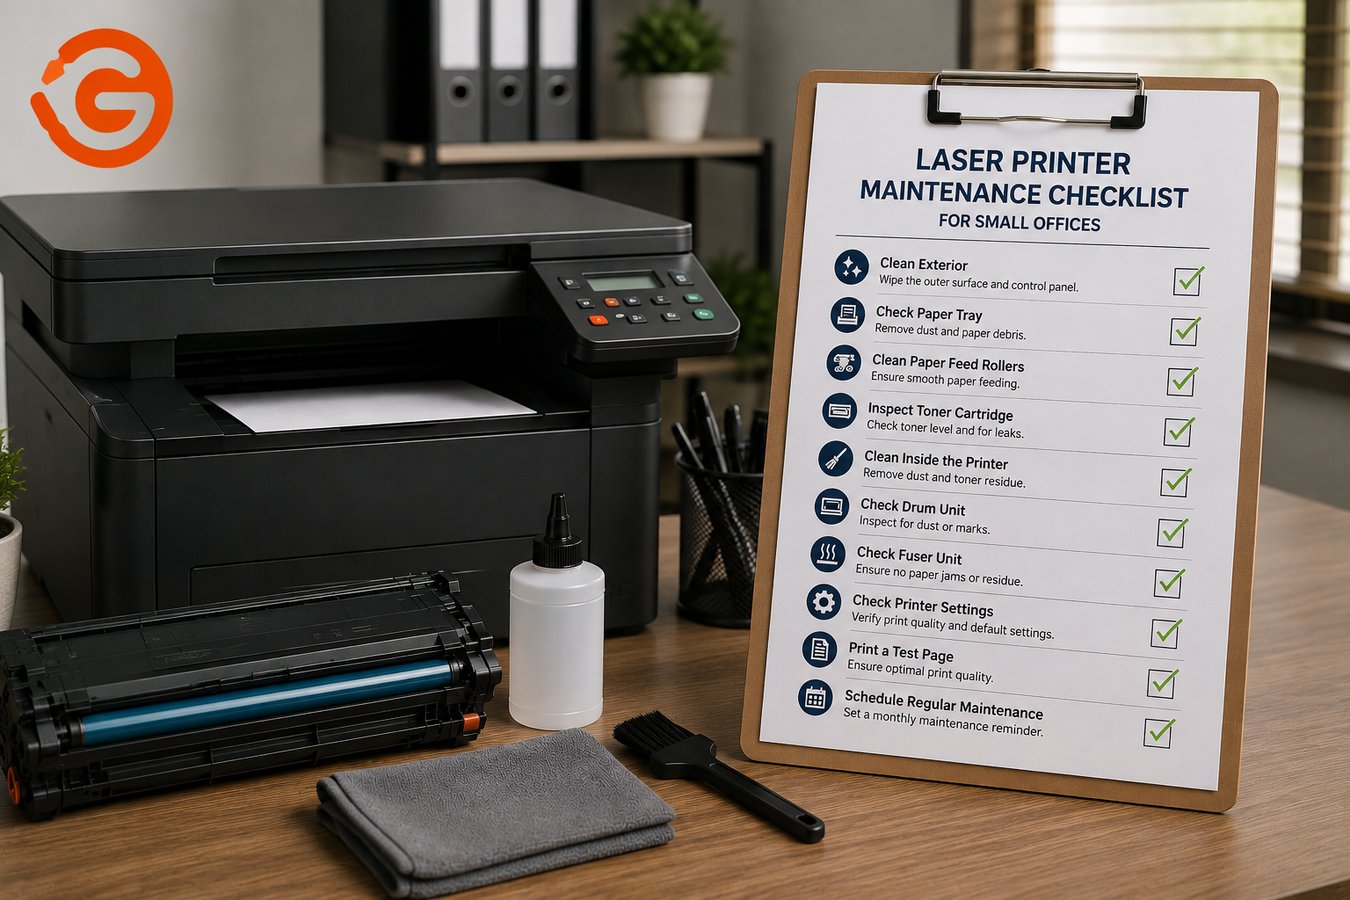
Clear visible dust and debris from the exterior and paper trays. A quick wipe-down prevents dust from working its way into the paper path over time.
Check paper trays for correct loading and condition. Curled, damp, or dog-eared paper in the tray is a common, entirely preventable cause of jams.
Glance at recent print output for early quality changes. Faint streaks, spots, or uneven density are easier to trace back to a cause when caught early rather than after weeks of degraded output nobody flagged.
Clear any paper jams properly, following the printer's own release points rather than forcing paper out, which can damage rollers or leave torn fragments jammed further inside.
Monthly Checks (10 to 15 Minutes)
Clean the interior lightly. Use a soft brush or dry, lint-free cloth to remove visible toner dust, avoiding direct contact with the drum and fuser. If using canned air, keep the can upright and use short bursts held at a distance, since tilting the can or spraying too closely risks pushing toner dust deeper into the device rather than out of it, and never use canned air for the internal cleaning of sensitive optical components.
Inspect and clean the feed rollers with a slightly damp, lint-free cloth, using mild soap only if needed. Rollers that have hardened or picked up a film of dust and toner are one of the most common causes of paper misfeeds and jams.
Check toner cartridges for leaks or uneven distribution, gently shaking a cartridge only if the printer manufacturer's own documentation specifically permits it, since some cartridge designs shouldn't be shaken at all.
Run the printer's built-in cleaning or calibration routine from the tools or service menu, which typically handles drum cleaning and color calibration in one guided process rather than requiring manual intervention.
Update firmware and drivers when updates are available, since these occasionally include genuine fixes for print quality, connectivity, or performance issues rather than being purely cosmetic version bumps.
For multifunction printers, clean the scanner glass and automatic document feeder. These accumulate adhesive residue, correction fluid, and toner dust from handling documents, separate from anything happening inside the print engine itself. Use glass cleaner applied to a microfiber cloth, never sprayed directly onto the glass, and a slightly damp cloth on the ADF feed rollers.
Quarterly Checks (20 to 30 Minutes, More Hands-On)
Clean the corona wire. This thin wire, running parallel to the drum surface inside the cartridge assembly, is almost always the cause when you see streaking across the page. Most cartridges include a small built-in cleaning tab, often green or blue, that slides along the wire. Move it back and forth five to six times to clear buildup.
Visually inspect the drum surface for scratches, toner deposits, or visible wear, without ever touching it directly. Skin oils transfer permanently to the drum surface and cause print defects on every page afterward, so handle the assembly only by its designated edges or handles.
Check the fuser unit for contamination or uneven wear. The fuser is what actually bonds toner to the paper using heat, and a fuser with contaminated or unevenly worn rollers produces smudging or inconsistent tonality even when the drum and toner are both in good condition. Keep fingers away from the fuser roller regardless of whether the printer has been recently used, since it's designed to reach very high temperatures and can stay hot well after the printer is powered off.
Pull the lifetime page count from the printer's configuration page and compare it against the manufacturer's rated duty cycle for that specific model. A printer significantly beyond its rated cycle is still likely to print fine today while being genuinely closer to component failure than the output quality alone would suggest.
Discharge static before reaching inside the printer by touching a grounded metal surface first, since static electricity can damage sensitive internal components during hands-on cleaning.
Diagnosing Common Print Quality Problems
Streaking across the page is almost always a dirty corona wire, and the cleaning process above resolves this in the large majority of cases.
Ghosting, a faint, repeated version of a previously printed element appearing elsewhere on the page, is the most commonly misdiagnosed laser printer problem. It's caused either by a worn imaging drum or a fuser unit issue, not a paper or toner problem, which is why it's worth specifically checking the drum surface and fuser condition rather than assuming a cartridge needs replacing.
Repeating marks running down the page at a consistent interval point toward a scratched or damaged drum specifically, since the marks repeat at intervals matching the drum's circumference.
Faded or inconsistent density across a page or between print jobs often traces back to toner distribution issues within the cartridge, or in some cases, incorrect driver settings rather than a hardware fault at all.
Maintenance Kits: What They Are and Why the Alert Matters
Higher-volume laser printers include maintenance kits, typically covering the fuser assembly along with related rollers and components, rated for a specific page count and tracked separately from the toner cartridge count. When your printer displays a maintenance kit alert, this is worth treating as a genuine planning window, not background noise to dismiss. The printer will keep functioning for a while past the alert, but worn fuser components eventually produce faint or smeared output, increased jams, and ultimately fuser failure that can damage other parts of the print engine in the process. Replacing the kit when prompted is consistently far cheaper than the repair that follows ignoring it.
One detail worth knowing: maintenance kits are model-specific and tied to the printer's exact part number, not the toner cartridge number, so confirm the correct kit against your printer's configuration page rather than assuming compatibility based on toner cartridge matching alone.
Common Maintenance Mistakes Worth Avoiding
Using canned air aggressively inside the printer. Beyond the risk of pushing toner dust deeper into the machine, canned air isn't a substitute for proper cleaning of the drum, fuser, or corona wire, each of which needs its own specific handling.
Touching the drum with bare hands. This single habit causes more preventable print quality issues than almost anything else on this list, and it's easy to do accidentally while reaching past the drum to access something else.
Exposing the imaging drum to bright light or direct sunlight, even briefly. The drum is a light-sensitive component and can be damaged by exposure that would seem harmless for the rest of the printer.
Ignoring a maintenance kit alert because the printer still prints fine. As covered above, this is exactly the gap between "still working" and "already accumulating damage" that turns a scheduled, inexpensive replacement into an unplanned, more expensive repair.
Assuming every print quality issue means a new toner cartridge. Ghosting, streaking, and repeating marks are frequently drum, fuser, or corona wire issues that a new cartridge alone won't resolve.
When to Call a Professional Instead of Continuing DIY Maintenance
- A drum or fuser error persists after following reset procedures the manual describes
- Print quality stays poor after a proper cleaning of the corona wire, drum inspection, and fuser check
- The printer is still under warranty and further internal access risks voiding coverage
- Faults keep recurring despite consistent maintenance, suggesting a deeper mechanical or electrical issue
- The printer has significantly exceeded its rated duty cycle and is showing any signs of degrading output
Why Choose Guru Computer Solution for Office Printer Maintenance
Scheduled Maintenance Plans for Small Offices We can set up a maintenance routine matched to your actual print volume, rather than leaving it to whoever happens to notice a problem first.
Proper Drum, Fuser, and Corona Wire Service We diagnose print quality issues at the actual component level rather than defaulting to a cartridge replacement for every symptom.
Maintenance Kit Sourcing and Installation We confirm the correct kit for your exact printer model and handle replacement before a fuser alert becomes a fuser failure.
Duty Cycle and Replacement Guidance We'll tell you honestly when a printer has genuinely reached the end of its practical service life versus when it's still a good candidate for continued maintenance.
Conclusion
Laser printer maintenance isn't complicated, but it does need to be consistent rather than reactive. A short daily habit, a monthly cleaning pass, and a more thorough quarterly check covering the corona wire, drum, and fuser catch the vast majority of print quality problems before they become jams, streaks, or a full fuser failure. The printers that reach seven, eight, or more years of reliable service in managed office environments aren't lucky. They're the ones actually following a schedule like this one.
If your office printer needs a proper inspection or you want help setting up a maintenance routine, contact Guru Computer Solution.