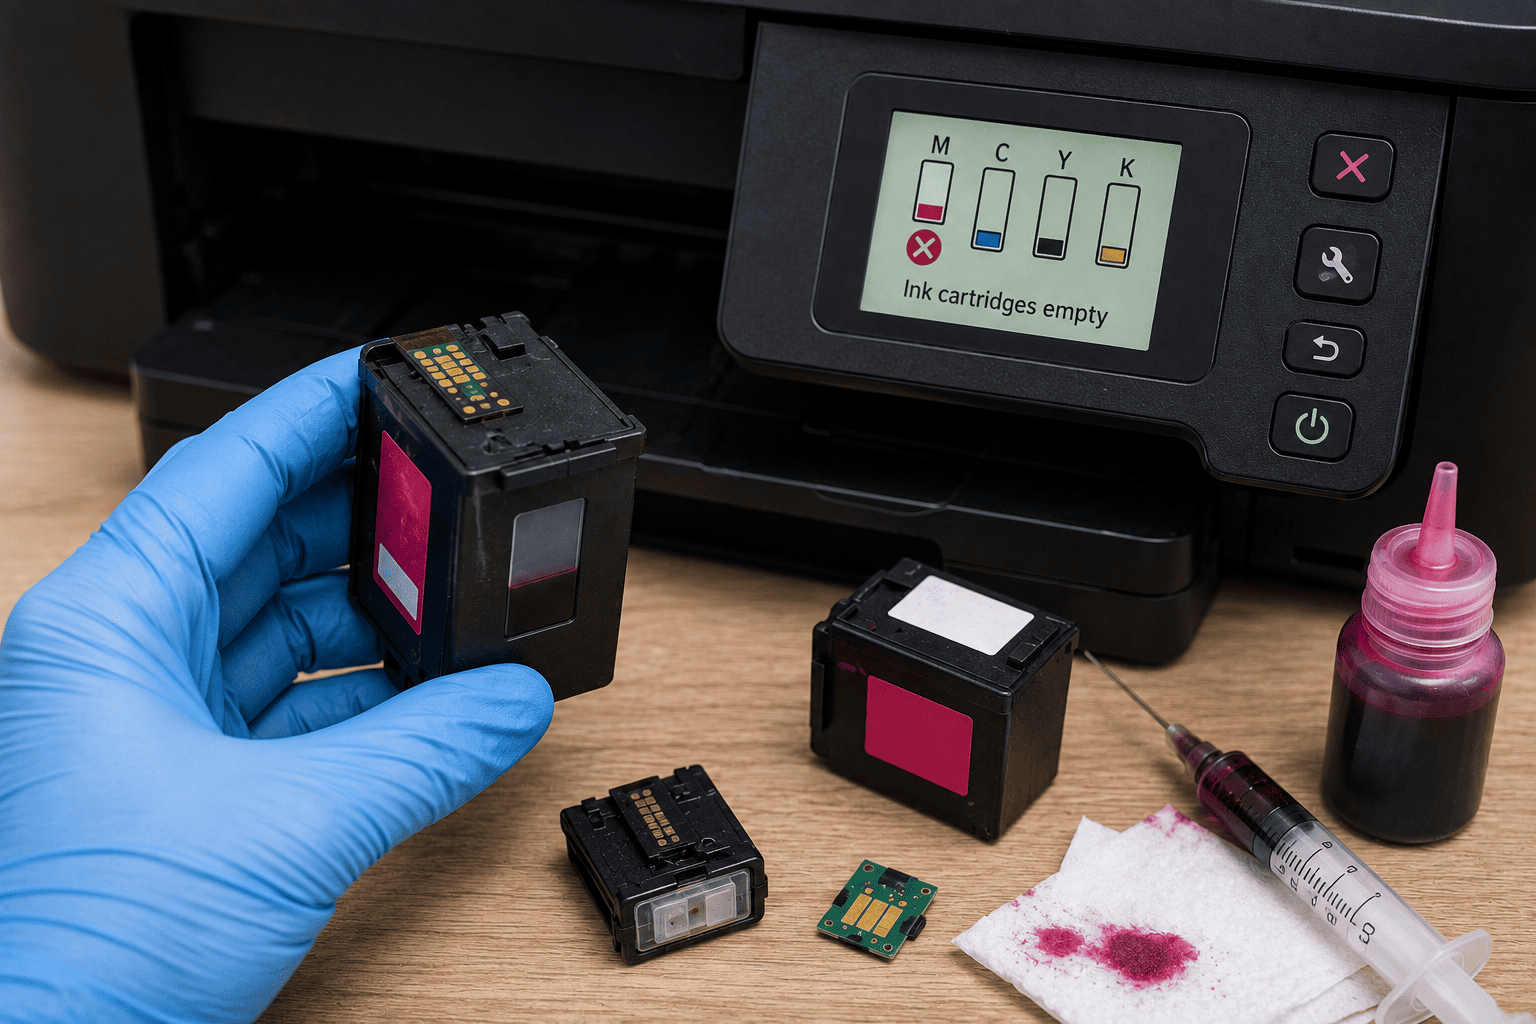
Refilling an ink cartridge can restore the ink supply, but the printer may still show “Empty,” “Low Ink,” or “Replace Cartridge” because the cartridge's electronic chip may still contain the previous ink-status information.
The printer generally does not measure the physical amount of ink inside a standard cartridge directly. Instead, it may rely on cartridge-chip information, usage calculations, or ink-level monitoring systems. After a refill, the printer may therefore continue reporting the cartridge as empty even though ink has been added.
Problem
The customer has refilled an ink cartridge, but the printer continues to display an empty or low-ink warning.
The cartridge may contain sufficient ink and may even produce good-quality prints, but the printer's reported ink level does not change.
What Problem Is the Customer Facing?
Customers may experience:
- Ink level still shows empty after refill
- Printer says “Low Ink” after cartridge refill
- Printer says “Replace Cartridge”
- Refilled cartridge is detected but shows empty
- Ink cartridge works but level remains at 0%
- Printer refuses to print after cartridge refill
- Ink warning appears after every restart
- Cartridge is recognized as previously used
- Printer asks for a new cartridge
- Ink-level indicator does not reset
- Refilled cartridge prints normally but status remains empty
- Printer reports an incorrect remaining-ink level
Root Causes of the Problem
1. Cartridge Chip Still Stores the Previous Status
The cartridge's electronic chip may retain information indicating that the cartridge has already been depleted or used.
Refilling the physical cartridge does not necessarily reset this electronic information.
2. Cartridge Chip Is Not Resettable
Some cartridge chips cannot be reset simply by adding ink.
Depending on the cartridge design, the chip may need to be replaced or a compatible reset procedure may be required.
3. Printer Uses Cartridge Usage Tracking
Some printers estimate ink consumption based on cartridge usage rather than directly measuring the amount of ink inside the cartridge.
This means refilling does not automatically restore the reported level.
4. Chip Contacts Are Dirty
Ink residue, dust, or oxidation on the cartridge contacts can prevent reliable communication between the cartridge and printer.
5. Cartridge Chip Is Damaged
The chip can become damaged during cartridge removal, refilling, cleaning, or handling.
A damaged chip may cause:
- Cartridge not recognized
- Empty warning
- Incorrect ink level
- Cartridge error
6. Refill Was Performed Without Resetting the Chip
Adding ink alone may not be enough if the cartridge's electronic status remains unchanged.
7. Cartridge and Printer Compatibility Problem
A third-party, refilled, or remanufactured cartridge may not communicate correctly with a particular printer model or firmware version.
8. Printer Firmware or Compatibility Change
A printer firmware update can sometimes affect compatibility with third-party or remanufactured cartridges.
The exact behavior depends on the printer and cartridge system.
How Can Customers Identify the Issue?
Look for:
- Cartridge prints despite showing empty
- Ink level remains at 0%
- Printer recognizes the cartridge but reports it as empty
- Warning appears immediately after refill
- Cartridge worked before being refilled
- Other cartridges show normal levels
- Printer displays a cartridge replacement message
- Cartridge contacts appear dirty
- Printer refuses to recognize the refilled cartridge
- Ink warning returns after restarting the printer
- Refilled cartridge works in one printer but not another
- Printer firmware was recently updated
Possible Solutions
1. Confirm the Cartridge Was Actually Refilled
Before troubleshooting the electronic status, verify that the cartridge contains ink.
A cartridge that is physically empty should not be used simply because the chip reports a different level.
2. Check Cartridge Compatibility
Confirm that the refilled cartridge is the correct cartridge family for the exact printer model.
Check:
- Cartridge number
- Printer model
- Regional cartridge variant
- Original or compatible cartridge design
3. Remove and Reinstall the Cartridge
Turn the printer off according to the manufacturer's procedure and reseat the cartridge.
Make sure it is properly positioned and locked into place.
4. Inspect the Cartridge Contacts
Inspect the electronic contacts for:
- Ink residue
- Dust
- Oxidation
- Scratches
- Physical damage
Clean them only using an appropriate procedure and avoid damaging the electronic contacts.
5. Check Whether the Cartridge Chip Is Resettable
Some refillable or compatible cartridge systems support chip-reset procedures.
The exact method depends on the cartridge model.
A technician should verify compatibility before attempting a reset.
6. Replace the Cartridge Chip When Appropriate
If the chip is damaged or no longer resettable, replacing the chip with a compatible component may be necessary for supported cartridge systems.
The replacement chip must match the correct cartridge and printer family.
7. Use a Compatible Refillable Cartridge System
For printers designed to support refillable cartridge systems, a compatible cartridge with a suitable monitoring chip may provide more reliable ink-level reporting.
Always verify compatibility with the exact printer model.
8. Check Whether the Printer Allows Continued Printing
Some printers allow continued printing after an empty or low-ink warning, while others may stop the print job.
The available options vary by printer and cartridge system.
If the printer provides an official option to continue printing, follow the manufacturer's instructions.
9. Check Printer Firmware
If the cartridge worked correctly before a firmware update, check whether the manufacturer has changed cartridge compatibility or ink-monitoring behavior.
Do not install unofficial firmware simply to bypass cartridge controls.
10. Test the Cartridge After Reset or Replacement
After servicing the cartridge, test:
- Cartridge recognition
- Ink-level status
- Print quality
- Color output
- Nozzle performance
- Printer error messages
A correct repair should address both the electronic status and actual print performance.
11. Perform a Nozzle Check
If the cartridge was refilled, print a nozzle-check or diagnostic pattern if the printer supports it.
Look for:
- Missing lines
- Broken patterns
- Weak colors
- Uneven ink output
- Incorrect color
An accurate ink-level reading does not guarantee that the cartridge is dispensing ink properly.
12. Perform Cleaning Only When Necessary
If the cartridge has been stored for a long time, its nozzles may become partially blocked.
Use the printer's recommended cleaning procedure rather than repeatedly running cleaning cycles.
Excessive cleaning can consume additional ink.
13. Check the Cartridge for Leakage
After refilling, inspect the cartridge for:
- Ink leakage
- Damaged seals
- Cracked housing
- Blocked vents
- Incorrectly installed plugs
A refill should not compromise the cartridge's ventilation or sealing system.
14. Replace the Cartridge When the Chip Cannot Be Recovered
If the cartridge chip is damaged, incompatible, or permanently locked, replacement may be more practical than repeated reset attempts.
15. Avoid Unverified Chip-Reset Methods
Random methods found online may damage the cartridge contacts, cause leaks, or create additional printer errors.
Use a reset procedure specifically intended for the exact cartridge model.
Why Choose Guru Computer Solution?
1. Experienced Printer Technicians
Our technicians can diagnose cartridge recognition, chip, ink-level, refill, and printer communication problems.
2. Cartridge Chip Diagnosis
We can determine whether the problem is related to the physical ink supply, electronic chip, contacts, or printer compatibility.
3. Refill and Cartridge Support
We can inspect refilled cartridges and determine whether the cartridge can be serviced, reset, chipped, or should be replaced.
4. Printer Compatibility Check
We verify the cartridge and printer model before recommending a chip or replacement cartridge.
5. Print Quality Testing
After servicing, we can test ink output, nozzle performance, color accuracy, and cartridge recognition.
6. Affordable Repair
We diagnose the actual cartridge problem before recommending unnecessary printer replacement.